4. Creating a Batch Job
You can create a batch job in three different
ways in Dynamics AX: from the dialog box of a batch-enabled class, using
the Batch Job designer form, or using the Batch Developer API.
The technique you use depends on the size and
complexity of your batch job. A simple batch job consisting of a single
task with no dependencies on other tasks would typically be created from
the dialog box of a batch-enabled class; a more complex batch job
composed of several batch tasks that might have dependencies is created
using the Batch Job form; and highly complex and very large batch jobs,
or those that need to be integrated with other business logic, are
created from the Batch Developer API. In the following subsections, we
provide an example in each category.
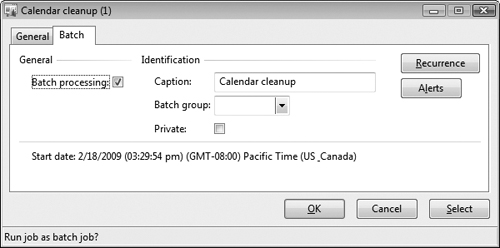
4.1 From the Dialog Box of a Class
The simplest way to execute a class as a batch
job is to select the Batch Processing check box on the Batch tab of your
class’s dialog box, as shown for the Calendar Cleanup class dialog box
in Figure 1.
If you enable that option and click OK, the class is saved as a new
batch job with one task. The batch job doesn’t run immediately; instead,
it runs at the date and time you set, and with the frequency you
indicate, in the Recurrence form.
Tip
You can remove recurrence from a batch job by clicking Functions and then Remove Recurrence on the Batch Job form. |
Two other controls in the dialog box are of particular interest: the Batch Group attribute and the Alerts button.
Batch Group
This batch-task attribute allows an administrator to determine which
AOS runs the task, how many tasks an AOS can run in parallel, and on
which servers a task can be executed.
Alerts
This functionality sends an alert when a batch job ends successfully,
fails, or is canceled. Alerts are particularly helpful for monitoring
jobs that run on the server outside of business hours. You can set up
alerts for the job by clicking the Alerts button, choosing the
conditions for the alert, and saving your choices. The system stores the
alert rule and triggers it when the conditions are met.
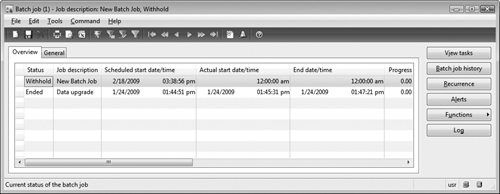
4.2 From the Batch Job Form
You use the Batch Job form for jobs that include
many tasks that might have a complex set of dependencies. You can use
this form to create a batch job, add tasks to it, and set up
dependencies between tasks. The Batch Job form is accessed through the
Dynamics AX basic module: Inquiries\Batch Job.
Create a Batch Job
Creating a batch job from the Batch Job form is
straightforward. Press Ctrl+N to create a new batch job, and then enter
the details for the job: a description and the date and time at which
you want the job to start.
Note
If you don’t enter a date and time, the current date and time are entered automatically. |
You can also set up
Recurrence for the batch job by clicking the Recurrence button and
entering a range and pattern for the recurrence. Make sure to save the
batch job by pressing Ctrl+S.
After you create the batch job, you add tasks to it and any dependencies the tasks have.
Figure 2 shows the Batch Job form.
Add a Task to a Batch Job
After you create a batch job, you can start
adding tasks to it and creating dependencies between them by using the
Batch Tasks form. The Batch Tasks form opens when you click the View
Tasks button on the Batch Job form.
Note
You
can open the Batch Tasks form from several places. For example, you can
open it by clicking Batch Jobs in the main menu or by choosing Batch
Job List—User. Both menu items open the same form, but information
presented to the user in the Batch Tasks form differs depending on which
menu item you use to open it. |
Depending on how you open the Batch Tasks form
and your level of access, you can view either the batch jobs that you
have created or all batch jobs that have been scheduled in the system.
From the Batch Tasks form, you can also change
the status of batch tasks or delete tasks that are no longer needed.
Press Ctrl+N to create a new task, and then specify the data associated
with that task: enter a description for the task in the Task Description
field, select the company in which the task runs in the Company
Accounts field, and in the Class Name field, select the process you want
the task to run—classes appear in the list (a look-up list that
appears, containing all available classes) only if the property CanGoBatchJournal is enabled.
If necessary, select a batch group for the task, and then make sure you save the task by pressing Ctrl+S.
Note
Some
classes are designated to run on the client. You can add client tasks
to a batch job. However, you must run client tasks manually by using the
Set Up Batch Processing form, available in the Dynamics AX basic
module: Periodic\Batch\Processing. In addition, client tasks must belong
to a batch group. |
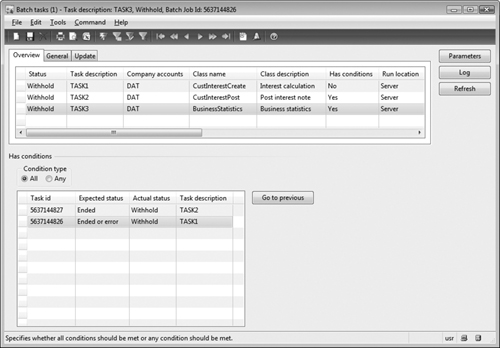
Figure 3 shows the Batch Tasks designer form.
Class parameters
As we’ve said, each batch task represents a
batch-enabled class. Sometimes you need to set up parameters for that
class. For example, you might need to specify posting parameters for
invoice posting. To do that, click the Parameters button in the Batch
Tasks form. A dialog box specific to the selected class is displayed.
After you specify the necessary parameters and click OK, the class
parameters are packed and saved in the Batch table and are restored during class execution.
Define dependencies between tasks
After you’ve created the batch job and added
tasks to it, you can use the Batch Tasks designer form to define
dependencies between the tasks. If no dependencies or conditions are
defined within a job, the batch server schedules all tasks in parallel,
up to a maximum you configure with the parameter Maximum Batch Threads
in the Server Configuration form.
If
you need to use advanced sequencing for batch tasks to accommodate your
business process flow requirements, you can use the Batch Task designer
or Batch Developer API, both of which are included in the Batch
framework. You can use these tools to construct complex dependency
trees, which allow you to schedule batch jobs tasks in parallel, add
multiple dependencies between jobs tasks, choose different execution
paths based on the results of the previous job task, and so on.
To control execution order, you can make a
task dependent on another task in the same job, and set up conditions
for the execution of both tasks.
For example, consider the job JOB1, with seven tasks: TASK1, TASK2, TASK3, TASK4, TASK5, TASK6, and TASK7:
TASK1 is the first task.
TASK2 runs ON COMPLETION (“Ended or Error”) of TASK1 (regardless of the success or failure of TASK1).
TASK3 runs ON SUCCESS (“Ended”) of TASK2.
TASK4 runs ON SUCCESS (“Ended”) of TASK2.
TASK5 runs ON FAILURE (“Error”) of TASK2.
TASK6 runs ON FAILURE (“Error”) of TASK3.
TASK7 runs ON SUCCESS (“Ended”) of both TASK3 and TASK4.
Figure 4 shows the dependency tree for JOB1.
To
define these task dependencies and to tell the system how to handle
them, select a child task (for example, TASK2 from the preceding list),
click the Has Conditions grid in the Batch Tasks form, and follow these
steps:
1. | Press Ctrl+N to create a new condition.
|
2. | Select the task ID of the parent task, such as TASK1.
|
3. | Select
the expected status that the parent task must reach before the
dependent task can run. For example, TASK2 starts when TASK1 becomes
“Ended or Error.”
|
4. | Press Ctrl+S to save the condition.
|
5. | If
you’ve entered more than one condition and if all conditions must be
met before the dependent task can run, select a condition type of All.
|
6. | Select a condition type of Any if the dependent task can run after any of the conditions are met.
|
You can also choose how the system handles
task failures in the Batch Tasks designer form. To ignore the failure of
a specific task, select Ignore Task Failure for that task. If this
option is selected, the failure of the task doesn’t cause the job to
fail. You can also use the Maximum Retries field to specify the number
of times a task should be retried before it is considered to have
failed.